


E 도서관 시스템구축방안
 등록일 / 수정일
- 페이지 / 형식
- 자료평가
- 구매가격
- 2015.03.29 / 2015.03.29
- 31페이지 /
 pptx (파워포인트 2007이상)
 - 평가한 분이 없습니다. (구매금액의 3%지급)
- 1,200원
최대 20페이지까지 미리보기 서비스를 제공합니다.
자료평가하면 구매금액의 3%지급!
 1
1 2
2 3
3 4
4 5
5 6
6 7
7 8
8 9
9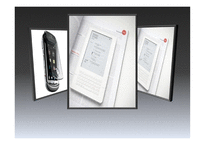 10
10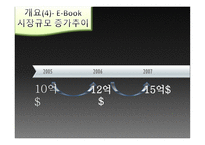 11
11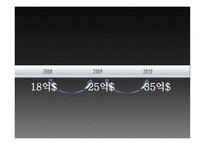 12
12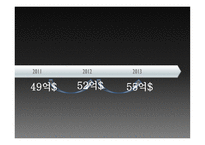 13
13 14
14 15
15 16
16 17
17 18
18 19
19 20
20
추천 연관자료
- 본문내용
-
경청해 주셔서
감사 합니다^^
SmartArt custom animation effects: pictures peek-in
(Basic)
To reproduce the SmartArt effects on this page, do the following:
On the Home tab, in the Slides group, click Layout, and then click Blank.
On the Insert tab, in the Illustrations group, click SmartArt.
In the Choose a SmartArt Graphic dialog box, in the left pane, click Matrix. In the Matrix pane, double-click Titled Matrix (second option from the left) to insert the graphic into the slide.
Select the graphic. Under SmartArt Tools, on the Format tab, click Size, and then do the following:
In the Height box, enter 5.67”.
In the Width box, enter 8.5”.
Under SmartArt Tools, on the Format tab, click Aange, click Align, and then do the following:
Click Align to Slide.
Click Align Middle.
Click Align Center.
Select the graphic, and then click one of the aows on the left border. In the Type your text here dialog box, enter text in the top-level bullet only (text for the rounded rectangle at the center of the graphic). To remove the [Text] placeholder in the second-level bullets, select each bullet and press SPACE.
On the slide, select the graphic. Under SmartArt Tools, on the Design tab, in the SmartArt Styles group, click More, and then under Best Match for Document click Moderate Effect.
Select the rounded rectangle at the center of the graphic. On the Home tab, in the Font group, select 28 from the Font Size list, click the aow next to Font , and then click White, Background 1 (first row, first option from the left).
With the rounded rectangle selected, under SmartArt Tools, on the Format tab, in the bottom right corner of the Shape Styles group, click the Format Shape dialog box launcher. In the Format Shape dialog box, click Fill in the left pane, select Gradient in the Fill pane, and then do the following:
In the Type list, select Linear.
In the Direction list, select Linear Up (second row, second option from the left).
Under Gradient stops, click Add or Remove until three stops appear in the drop-down list.
Also under Gradient stops, customize the gradient stops as follows:
Select Stop 1 from the list, and then do the following:
In the Stop position box, enter 0%.
Click the button next to , and then under Theme s click White, Background 1, Darker 35% (fifth row, first option from the left).
Select Stop 2 from the list, and then do the following:
In the Stop position box, enter 80%.
Click the button next to , and then under Theme s click White, Background 1, Darker 35% (fifth row, first option from the left).
Select Stop 3 from the list, and then do the following:
In the Stop position box, enter 100%.
Click the button next to , and then under Theme s click White, Background 1, Darker 15% (third row, first option from the left).
Right-click the top left shape in the graphic, and then click Format Shape. In the Format Shape dialog box, in the left pane, click Fill. In the Fill pane, click Picture or texture , and then under Insert from, click File. In the Insert Picture dialog box, select a picture and then click Insert.
Right-click the top right shape in the graphic, and then click Format Shape. In the Format Shape dialog box, in the left pane, click Fill. In the Fill pane, click Picture or texture , and then under Insert from, click File. In the Insert Picture dialog box, select a picture and then click Insert.
Right-click the bottom left shape in the graphic, and then click Format Shape. In the Format Shape dialog box, in the left pane, click Fill. In the Fill pane, click Picture or texture , and then under Insert from, click File. In the Insert Picture dialog box, select a picture and then click Insert.
Right-click the bottom right shape in the graphic, and then click Format Shape. In the Format Shape dialog box, in the left pane, click Fill. In the Fill pane, click Picture or texture , and then under Insert from, click File. In the Insert Picture dialog box, select a picture and then click Insert.
To reproduce the animation effects on this slide, do the following:
On the Animations tab, in the Animations group, click Custom Animation.
On the slide, select the graphic, and then do the following in the Custom Animation task pane:
Click Add Effect, point to Entrance, and then click More Effects. In the Add Entrance Effect dialog box, under Subtle, click Expand.
Under Modify: Expand, in the Speed list, select Fast.
Under Modify: Expand, in the Start list, select After Previous.
Also in the Custom Animation task pane, click the aow to the right of the animation effect, and then click Effect Options. In the Expand dialog box, on the SmartArt Animation tab, in the Group Graphic list, select One by one.
Also in the Custom Animation task pane, click the double-aow below the animation effect to expand the list of effects, and then do the following:
Press and hold CTRL, and then select all five animation effects in the Custom Animation task pane. Under Modify: E
자료평가
-
아직 평가한 내용이 없습니다.
회원 추천자료
- [전자도서관] 전자도서관 사례(헌법재판소를 중심으로)
- [디지털도서관][전자도서관][저작권]디지털도서관(전자도서관)저작권 변화,복제,관리모형, 디지털도서관(전자도서관)저작권 문제점,보호방안
- [교육청]서울시교육청, 경상북도교육청, 대구시교육청, 광주광역시교육청, 울산시교육청, 전라북도교육청 분석
- [교육부][교육과학기술부][교육인적자원부]교육부(교육과학기술부,교육인적자원부)역할, 교육부(교육과학기술부)사교육비경감대책,개편방안
- [미국 교육정보화][IT교육]미국 교육정보화의 평가, 미국 교육정보화의 기반구축, 미국 교육정보화의 수준측정도구, 미국 교육정보화의 정책, 미국 교육정보화의 IT(기술정보화)교육, 미국 교육정보화의 사례
오늘 본 자료
더보기
최근 판매 자료
- 문화와 관광이 결합된 문화관광상품을 하나 선정하여 다음의 요건으로 작성하
- 한중일 의복 비교
- 미세먼지와 초미세먼지 개념과 위험성 및 미세먼지 문제 해결방안 제시와 미세먼지 정책방향 제시
- [사회문화] 베트남과 한국의 예절 비교
- [인류학] 집배원노동자에 대해서
- 실습생프로파일(사회복지현장실습, 사회복지전공동기, 실습기관선택이유, 성취목표, 목표달성파악, 자신의강점과약점, 취미와특기, 바라는점)
- 동물실험 찬성,반대논쟁과 찬반토론 개요작성 및 동물실험 성공사례와 방법연구 및 동물실험에 대한 개인적 견해 및 느낀점
- [아동의 친사회적 행동] 친사회적 행동에 대한 정의(개념), 아동 친사회적 행동의 발달, 친사회적 행동에 영향을 미치는 요인
- [아동 생활지도와 상담] 기본 생활습관 형성의 의의와 지도 원리
- 가족상담및치료_가족 분석 보고서 가계도 작성법과 가계도 면접법을 바탕으로 자신의 가족 관계를 분석하시오

저작권 관련 사항 정보 및 게시물 내용의 진실성에 대하여 레포트샵은 보증하지 아니하며, 해당 정보 및 게시물의 저작권과 기타 법적 책임은 자료 등록자에게 있습니다. 위 정보 및 게시물 내용의 불법적 이용, 무단 전재·배포는 금지됩니다. 저작권침해, 명예훼손 등 분쟁요소 발견시 고객센터에 신고해 주시기 바랍니다.


